Getting the Samsung SCX-3405 to work with Ubuntu 18.04

As a user of a Samsung SCX printer/scanner, upgrading to a major Ubuntu version is always a pain. Over the last few releases, the SULDR repositories have kept me afloat. Since upgrading to 18.04 LTS those have failed me as well.

I usually only jump from LTS to LTS version, so I was happy to learn that, since Zesty support for IPP Everywhere printing is available.

Getting the scanner working

Put host & port into /etc/sane.d/xerox_mfp.conf

# Format is: tcp host_address [port]

tcp 192.165.2.19 9400

Getting the printer working

Open http://localhost:631/ Choose “Administration”,  click “Add Printer” (Log in using your credentials)

Look for your printer under the “Discovered Network Printers:” for an entry which contains the word “driverless”. Select the entry and click “Continue”.

Decide whether to share your printer and check the “Connection”. It should start with “ipp://” or “ipps://”, if not, go back a step and check whether you have selected the correct entry. Click “Continue”.

On the next page choose the correct model, preferring the entry containing “driverless”. Usually, this already happens automatically. Click “Add Printer”.

Set the option defaults, especially the correct page size/media size and click “Set Default Options”

Select “Print Test Page” under “Maintenance”.

Using openconnect on Ubuntu 15.10 fails

To use openconnect in Ubuntu 15.10 you have to set a default route to the tun0 device that is opened up. Otherwise no traffic will be routed through the tunnel. To do so:

sudo openconnect https://yourvpn.com

wait until the connect banner passes and openconnect displays:

Connected tun0 as ##.###.###.##, using SSL

Then open a new tab on the console or put openconnect in the background. Enter

sudo route add default gw ##.###.###.## tun0

This will route all outgoing traffic to the default gateway which is your tunnel.

Theres a bug opened up in ubuntu launchpad. While it is being investigated/fixed you can use above hack to still use VPN with openconnect.

Bug: network-manager-openconnect / 1502847
Via: openconnect-vpn-setup-is-failing-in-ubuntu-15-10

Vboxdriver setup required after every reboot on Ubuntu 15.10

So my virtualbox windows wouldn’t start after installing Ubuntu 15.10 and ask me to perform the vboxdrv setup after every reboot.  The reason is that vboxdrv not starting on boot, with Ubuntu 15.10. This did the trick for me:

sudo /usr/sbin/update-rc.d -f virtualbox remove 
sudo rm /etc/init.d/virtualbox
sudo systemctl enable vboxdrv

This fixes the autostart issue by removing virtualbox remnants and reenabling vboxdrv in systemd.

via: ubuntuforums.org

Using FFMpeg to convert videos for the VTech KidiGo

So a neighbor of mine came up to me with a VTech KidiGo. It’s a kids audiobook, mp3 and video player. And it’s a horrible one at that. You either have the choice to buy audio files and videos from VTech, or you’ll have to put up with a video player that only accepts a strange format.

So this neighbor came up to me wanting to put videos on this thing and of course nothing really worked. Everything I tried failed on the KidiGo with “Invalid Format”. Finally I tried to transcode the video with ffmpeg and what worked was the following:

ffmpeg -i input.avi -vf scale=480:272 -b:v 1M -vcodec libxvid output.avi

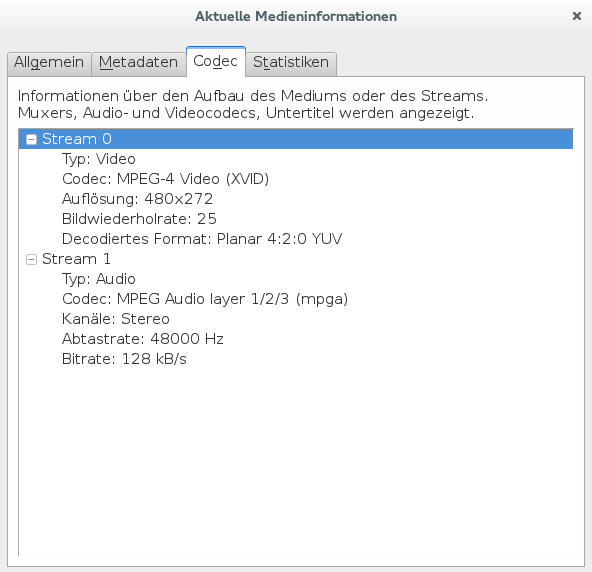
The resulting media file has the correct dimensions and the audio file is an untouched 128kbps mp3 stereo stream. Heres the VLC info on the resulting codec used:

the resulting codec used as displayed by vlc

Unable to find the sources of your current Linux kernel. Specify KERN_DIR and run Make again.

I recently upgraded my Fedora 20 with the latest kernel and came across an issue when I wanted to boot my Windows VM. VirtualBox told me to setup vboxdrv again, which refused to work, stopping the the error message:

DKMS: add completed. Failed to install using DKMS, attempting to install without Makefile:183: * Error: unable to find the sources of your current Linux kernel. Specify KERN_DIR=<directory> and run Make again. Stop.</directory>

The only thing that helped was to remove VirtualBox altogether.

yum remove VirtualBox-4.3

And then reinstall it from rpmfusion with the kmod meta-package which install VirtualBox alongside the correct kernel sources.

yum install VirtualBox kmod-VirtualBox

After installing the VirtualBox extensions I was able to bring my Windows VM back up.

via: https://ask.fedoraproject.org/en/question/40926/trying-to-install-virtualbox-or-vmware-fedora-20/